AOOSTAR EG02 eGPU Dock
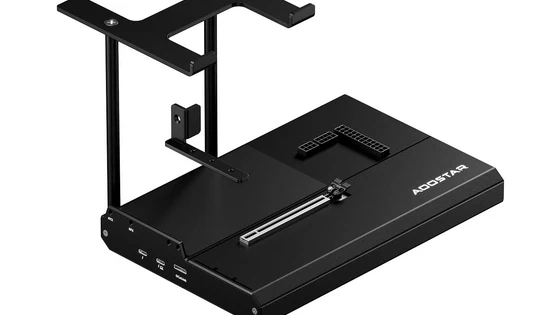
There are two Thunderbolt 5 ports. One is a Thunderbolt 5 output port rated at 5V/3A. Beyond standard external docks and hard drives, it supports display output—for instance, connecting a portable monitor enables both power delivery and video output. Note that this port cannot connect to a mini PC, as doing so will result in no signal output. The other Thunderbolt 5 port, marked with a computer icon, supports 100W external power delivery. It’s typically used for direct connection to mini PCs, offering hot-swappable plug-and-play functionality. It’s also backward compatible with Thunderbolt 3, Thunderbolt 4, and USB4 devices. Beyond the Thunderbolt 5 ports, we’ve retained the Oculink port from the EG01, which also achieves PCIe 4.0 x4 speeds. Like the EG01, we’ve included a DC power port for mini PCs. The accessory box includes a DC adapter cable (12V, 12A) and an 80cm Thunderbolt 5 data cable. Other standard interfaces include the motherboard power connector, GPU PCIe power connectors, and CPU power connectors. Compatible with single-fan, dual-fan, triple-fan, turbo-fan, full-height, and half-height graphics cards, offering exceptional expandability. Users can freely mix and match different GPUs without power consumption concerns.
On the right side is a power switch button. Similar to a power supply with a switch, pressing it activates the power supply before booting the system. The specific operation sequence and precautions will be demonstrated in detail during the installation guide later.
First, remove the included bracket to Install . Place the power supply on the anti-slip pad and tighten the two handle screws on the bottom sides to secure it. Insert the graphics card and use the included mounting bracket to firmly lock it in place. This method ensures the card remains stable and free from tilting or wobbling. Next, connect the 24-pin power cable and the CPU power cable. Plug in the graphics card’s power cable and the DC adapter cable to complete the installation. This demonstration utilizes MACO’s mini PC. Power is supplied to the mini PC via the graphics card dock’s DC port, eliminating the need for an additional power adapter. This significantly enhances overall cable management tidiness.
Oculink Interface Demonstration: With the system powered off, connect the Oculink cable to both the graphics card dock and the mini PC. Then attach the HDMI cable. Turn on the external power switch. For the first boot, press the graphics card dock switch first, then the mini PC will start up, followed by the graphics card dock.
Thunderbolt 5 Interface Demonstration: Connect the Thunderbolt 5 cable to both the graphics card dock and the mini PC. Turn on the external power switch. Manually press the graphics card dock’s power button first to supply power to the external power source, then start the mini PC—the graphics card dock will boot up automatically.
A key design feature: if the mini PC is still running, pressing the graphics card dock’s power button will not cut power. This is a power-off protection measure we designed for the EG series graphics card docks, preventing accidental power interruptions during operation that could cause malfunctions. Due to this power-off protection, the AOOSTAR EG series GPU dock’s switch is non-mandatory. To stop operation, first shut down the mini PC, then press the GPU dock switch.
A mini PC or slim gaming laptop paired with a graphics card docking station offers the perfect solution for balancing performance and portability! AOOSTAR’s EG02 graphics card dock takes it further with powerful dual Thunderbolt 5 + Oculink ports. Its triple-pronged approach—combining high bandwidth, high power delivery, and full-feature integration—overcomes the performance bottlenecks and portability trade-offs typically associated with external graphics cards. For users seeking the dual-purpose portability and performance of “one device, two uses,” it delivers the closest mobile experience to a desktop setup currently available. The AOOSTAR EG02 is especially suited for hardcore gamers, creative professionals, and multi-monitor productivity users.
Did this article help you? If so, please tell me in a comment what do you think about it.
Don’t miss any of our future video tutorials, follow us on Youtube. Like us on Facebook. Join our Best Deals Telegram Channel. Join our Android TV Box Firmware Updates Telegram Channel. Subscribe now to our newsletter. If you need Tech Reviewer or Youtube Influencer read this. Donate now here to support CGR Team!