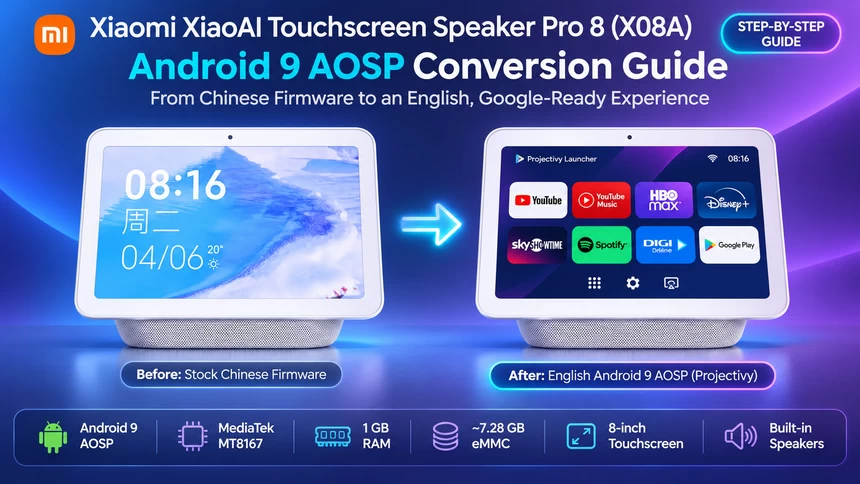
The Xiaomi XiaoAI Touchscreen Speaker Pro 8, model X08A, is a surprisingly capable device limited by software designed primarily for mainland China. Its 8-inch touchscreen, integrated speakers and compact form factor make it an attractive smart display, but the original XiaoAI environment comes with Chinese-language content, Xiaomi-specific services, regional restrictions and limited flexibility when it comes to installing applications. We wanted something substantially different: a clean Android installation that would retain the device’s original hardware support while replacing its China-focused software experience with an English interface, functional Google Play Store, streaming applications and a customizable TV-style home screen. After extensive experimentation with different Android versions, firmware images and system configurations, we achieved that goal with Android 9 AOSP (API 28), ARM32, Projectivy Launcher and Google services. This is not simply an alternative launcher placed over the original Chinese Xiaomi interface. It is a genuine AOSP system conversion, retaining the hardware-specific components necessary for the X08A to operate. It is also important to distinguish this setup from official Android TV or Google TV. Our installation uses Android 9 AOSP with Projectivy Launcher providing the television-style interface. It is not a Google-certified Android TV firmware. The result on our X08A has been extremely encouraging.
What Makes the Xiaomi X08A Interesting?
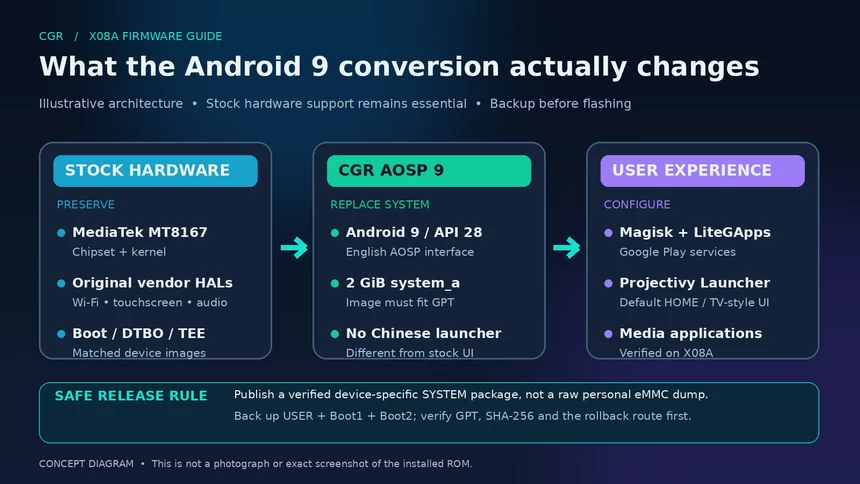
The XiaoAI Touchscreen Speaker Pro 8 features an 8-inch display, a MediaTek MT8167-family platform, approximately 1 GB RAM and an eMMC storage system with a total USER region of about 7.28 GiB. Its hardware is sufficient for a variety of everyday tasks, provided the operating system is reasonably lightweight and applications are carefully selected. The original firmware is heavily integrated with China’s Xiaomi ecosystem. For users outside China, this creates practical limitations, particularly around language, online services, application availability and regional behavior. Our goal was to keep the hardware support while replacing the Chinese user experience with Android Open Source Project software. The installation retains the original device-specific boot and hardware components where required. The AOSP system supplies the Android environment, while additional applications deliver Google integration and the interface we actually want to use.
What Has Improved?
– An English Android Interface. The most noticeable improvement is the replacement of the original China-focused interface with a familiar English Android environment. Users no longer need to navigate the original Chinese Xiaomi home screen to access their applications.
– A Functional Google Play Store. One of the most important achievements was restoring reliable Google authentication and application downloads. Our final tested configuration uses Google Play Services 26.43.30 and Google Play Store 54.0.09. The first installation was not trouble-free. An older Google Play Services version repeatedly caused authentication failures, including Google Check-in errors. Updating Google Play Services resolved the problem on our unit, after which Play Store sign-in and application downloads worked correctly.
– Projectivy Launcher: A TV-Style Experience. We installed Projectivy Launcher 4.73 and configured it as the system’s default HOME application. This completely changes the everyday experience of using the speaker. Instead of navigating the original Xiaomi interface, we now have a customizable home screen with application shortcuts, categories and a layout better suited to a compact multimedia display. Projectivy can be configured with static backgrounds and fewer dynamic elements, which is especially useful on devices with limited RAM.
– Streaming and Music Applications. A major achievement of this conversion is application compatibility. On our tested Xiaomi X08A, we successfully used YouTube, YouTube Music, HBO Max, SkyShowtime, Disney+, Spotify and DIGI Online. YouTube and YouTube Music worked perfectly during testing. HBO Max, SkyShowtime, Disney+ and Spotify also performed very well. For Romanian live television, the working application was DIGI Online, using package identifier ro.rcsrds.digionline. The newer DIGI TV application should not be confused with DIGI Online; an earlier ARM32 DIGI TV build failed to launch correctly in our experiments. Application support is not a permanent guarantee. Streaming providers may change minimum Android versions, DRM requirements and supported devices. We are reporting what actually worked on our X08A rather than promising universal compatibility.
Before You Begin: Important Requirements
This is an advanced firmware modification and should only be attempted by users familiar with MediaTek devices, Android partitions and firmware recovery. Our successful work was carried out using a Windows 10 x64 PC, Python 3, MTKClient 2.1.4, Android Platform Tools, MediaTek USB drivers and UsbDk. A reliable USB data cable, physical access to the device and sufficient backup storage are essential. Most importantly, a complete original firmware backup should be created before modifying any partitions. Firmware release status: The current Android 9 AOSP configuration is working on our CGR device, but its public installation image and complete rollback procedure are not yet released. Our new full eMMC backup is still being verified. Do not flash unverified images or copy another device owner’s complete eMMC dump onto your speaker.
Step 1 — Identify Your Xiaomi X08A
Begin by confirming that your device is specifically the Xiaomi XiaoAI Touchscreen Speaker Pro 8, model X08A. Other Xiaomi smart displays can use different chipsets, partition layouts and boot configurations. If Android Debug Bridge is available, open PowerShell and identify the device:
“`powershell
$adb = ‘C:/adb/adb.exe’
& $adb devices -l
& $adb shell getprop ro.product.cpu.abilist
& $adb shell getprop ro.treble.enabled
& $adb shell getprop ro.boot.slot_suffix
& $adb shell getprop ro.build.version.sdk
“`
Our working AOSP configuration reports Android 9 / API 28, ARM32 (armeabi-v7a) and active slot _a. If ADB is unavailable on the original firmware, do not erase anything simply to enable it. Instead, identify the device and inspect its partition layout through MediaTek tools.
Step 2 — Create a Complete Backup of the Original Chinese Firmware
This is the most important preparation step. The X08A uses multiple eMMC regions. The main USER region contains the partition table, Android partitions, application data and device-specific information. The separate Boot1 and Boot2 regions are also important for recovery. We recommend saving all three regions before making any changes. Using MTKClient from Windows PowerShell, enter the properly detected MediaTek BROM/DA mode and execute the following read-only commands:
“`powershell
Set-Location C:\mtkclient
python .\mtk.py printgpt
python .\mtk.py rf “F:\X08A_BACKUP\stock_emmc_user.bin” –parttype user
python .\mtk.py rf “F:\X08A_BACKUP\stock_emmc_boot1.bin” –parttype boot1
python .\mtk.py rf “F:\X08A_BACKUP\stock_emmc_boot2.bin” –parttype boot2
“`
Create the destination directory before running these commands. On our unit, the expected USER image size is 7,818,182,656 bytes. Boot1 and Boot2 are 4,194,304 bytes each. After dumping, calculate SHA-256 hashes and verify the partition layout. Do not rely on the existence or size of a backup file alone as proof that it can restore the device. The original backup may contain unique calibration, identification and configuration data. It should remain private and should not be distributed as a public firmware package.
Step 3 — Understand the Firmware Components
The Xiaomi X08A has an A/B-style partition layout. Important partitions include boot_a, boot_b, system_a, system_b, vendor_a, vendor_b, dtbo_a, dtbo_b, along with bootloader and hardware-related partitions. The currently working CGR installation uses slot A. On our current partition map, system_a occupies 2 GiB, while vendor_a occupies 512 MiB. However, the partition layout has changed during our development work. The factory layout must not be assumed to be identical to our present configuration. This matters because flashing a complete image onto a device with a different GPT layout can overwrite critical partitions. The intended CGR release package must therefore include a verified Android 9 AOSP system image, file checksums, exact partition requirements and a recovery procedure. Hardware-specific components must be retained or matched to the exact supported firmware.
Step 4 — Connect the X08A in MediaTek BROM/DA Mode
Power off the device completely. On our unit, the established recovery procedure involved the physical Volume+ and Power buttons while connecting the USB cable. The exact entry method should be verified for the particular unit being modified. Launch MTKClient and check that it can communicate with the MediaTek platform.
“`powershell
Set-Location C:\mtkclient
python .\mtk.py printgpt
“`
A successful connection on our X08A reported the MediaTek Download Agent loading, successful DRAM initialization, detection of the 8GTF4R eMMC and the complete GPT partition table. If you encounter repeated Handshake failed messages, stop and check the USB connection, driver and device mode. An Android ADB connection is not the same as BROM or Download Agent mode. Do not attempt write operations before MTKClient can reliably read the device information.
Step 5 — Install the Verified Android 9 AOSP System Image
MTKClient supports writing individual partitions. Its command structure is:
“`powershell
python mtk.py w <partition> <image>
“`
The following illustrates the command format for writing the A-slot system partition:
“`powershell
# EXAMPLE ONLY — do not execute with an unverified image
python .\mtk.py w system_a “C:\X08A_CGR_RELEASE\system_a_verified.img”
“`
This is not yet a public, independently verified stock-to-CGR installation command. It must only be used after the matching image, its checksum, the target partition size and the supported GPT layout have been confirmed. The final CGR firmware release must specify exactly how boot_a, vendor_a, dtbo_a and the other required components are handled. Do not blindly overwrite bootloader partitions, hardware calibration areas, NVRAM, persist, metadata or the entire eMMC. A clean installation may require initializing userdata, but that operation permanently removes applications and user data. It should only be carried out when the verified release instructions require it and a complete recovery backup already exists.
Step 6 — First Boot and English Android Setup
After completing a verified installation, start the X08A and confirm that the English Android interface appears. Test the touchscreen, wireless networking, display orientation, audio output and basic Android navigation before installing additional applications. If ADB is available, confirm the platform:
“`powershell
& $adb shell getprop ro.build.version.release
& $adb shell getprop ro.build.version.sdk
& $adb shell getprop ro.product.cpu.abilist
“`
Our successful configuration uses Android 9, API 28 and ARM32 userspace. Do not continue to additional software installation if the base system is unstable.
Step 7 — Install Magisk and LiteGApps
We used Magisk 31.1 and LiteGApps v5.0 for Android 9 ARM32 to enable Google services on our installation. The exact Magisk boot patching method depends on the compatible boot image and the system-as-root configuration. A patched boot image intended for a different firmware version or device must not be used blindly. After Magisk is functioning correctly, install the appropriate LiteGApps package and confirm that its module has been staged successfully. The module should identify Android 9 / API 28 and the ARM architecture. A correctly installed package does not automatically guarantee working Google authentication. We initially encountered Google Play Services 14.7.99 and Play Store 12.4.14, with repeated account sign-in failures. Updating Google Play Services to version 26.43.30 (100300) resolved the authentication issue on our X08A. Google Play Store subsequently updated to version 54.0.09. Once Google authentication works, stop changing Google components unnecessarily.
Step 8 — Update Android System WebView
Our AOSP installation originally used WebView 66.0.3359.158. We later installed Google Android System WebView 138.0.7204.181, compatible with Android 9 ARM32. After installation, verify the current provider:
“`powershell
& $adb shell dumpsys webviewupdate
“`
Our final result showed Google WebView 138 as the active provider, with one RELRO process started and one completed. Keep the original system WebView available as a fallback until the replacement has been tested. Android 9 is no longer supported by current Chromium releases; WebView 138 is from the last generation supporting this OS. It improves the bundled 2018-era version but does not make Android 9 a currently supported platform.
Step 9 — Install Projectivy Launcher
Projectivy Launcher is central to our new everyday experience. We successfully installed version 4.73 from the developer’s APK release and configured it as the default HOME application. To check the active launcher through ADB:
“`powershell
& $adb shell cmd package resolve-activity –brief `
-a android.intent.action.MAIN `
-c android.intent.category.HOME
“`
On our X08A the result is:
“`powershell
com.spocky.projengmenu/.ui.home.MainActivity
“`
For a low-RAM device, we recommend static wallpapers, fewer dynamic rows and an organized selection of regularly used applications. Do not remove your fallback home interface until you have verified that Projectivy launches reliably.
Step 10 — Install and Test Your Favorite Applications
The real improvement comes from being able to choose the applications you want. Our working X08A installation supports YouTube, YouTube Music, HBO Max, SkyShowtime, Disney+, Spotify and DIGI Online. Google Play handles many installations directly, while some applications require compatible APK packages. Always check the package’s Android requirement, architecture, signature and split-APK configuration. On our ARM32 installation, ARM64-only packages are incompatible. A successful APK installation also does not guarantee that the application launches or plays content. Test the actual functionality, not just the application icon.
Step 11 — Optimize Android for 1 GB RAM
We applied conservative Android settings to improve responsiveness without disabling essential system components. Our configuration uses animation scales of 0.5:
“`powershell
& $adb shell settings put global window_animation_scale 0.5
& $adb shell settings put global transition_animation_scale 0.5
& $adb shell settings put global animator_duration_scale 0.5
“`
We also configured a maximum of eight cached processes:
“`powershell
& $adb shell settings put global activity_manager_constants max_cached_processes=8
“`
These tweaks can improve the perceived responsiveness of the interface, but they are not equivalent to adding RAM. For the correct landscape orientation on our X08A, we use:
“`powershell
& $adb shell settings put system accelerometer_rotation 0
& $adb shell settings put system user_rotation 0
“`
Setting user_rotation=1 incorrectly rotates our device by 90 degrees. To mute notification sounds without muting multimedia:
“`powershell
& $adb shell media volume –stream 5 –set 0
“`
We separately disabled the sound produced by the Android Keyboard (AOSP) through its own Preferences menu. ZRAM remains an unfinished optimization. Although the kernel exposes a ZRAM device, initialization currently fails with a permission error. We have not enabled it or configured an automatic boot script.
Step 12 — Verify Stability and Create a New Backup
Before considering the conversion complete, verify touchscreen operation, Wi-Fi connectivity, audio, Projectivy, Google sign-in, Play Store installation, WebView and streaming playback. Check SystemUI memory usage and Android crash logs. Our latest SystemUI reading was approximately 47 MiB PSS, and the inspected event log did not report recent ANR or crash entries. Once the system is stable, power off the device and make a new complete eMMC backup through MTKClient. Verify the USER, Boot1 and Boot2 images, calculate SHA-256 checksums and retain a restoration route. Do not remove historical recovery backups or experiment with GPT repartitioning until the current system’s full backup has been verified.
Troubleshooting Based on Our Experience
During our testing, MTKClient handshake errors typically required us to confirm that the speaker was in the correct MediaTek USB mode, because an ADB connection alone does not establish a BROM/DA session. When Google Play Store could not sign in, we checked the active Google Play Services version, Google Services Framework and Google Check-in errors before considering repeated application-data wipes or region changes. If an application installed but closed immediately, we verified the processor architecture, launchable activity, logcat messages and any required Google components, as we did during our earlier DIGI TV tests. For WebView compatibility issues, we inspected `dumpsys webviewupdate` to verify that the selected provider was valid and RELRO initialization had completed. We also found it important to measure actual RAM consumption and inspect ANR events when troubleshooting SystemUI freezes, rather than aggressively disabling services and potentially creating additional instability.
Can the Entire Internal Storage Be Reorganized?
Theoretically, parts of the eMMC partition map can be redesigned, but this is not equivalent to formatting the entire device and installing Android onto one giant partition. The X08A requires bootloader, hardware-related, system and data partitions. Our current configuration already has substantially reduced B-slot system and vendor partitions, which limits the potential space recovery. Any future repartitioning must use a thoroughly verified backup and recovery procedure. We do not recommend making GPT changes as part of the standard AOSP installation.
Final Verdict: A New Life for the Xiaomi X08A
The transformation of our Xiaomi XiaoAI Touchscreen Speaker Pro 8 has been one of the most rewarding firmware projects we have attempted. Instead of a smart display tied primarily to the Chinese Xiaomi ecosystem, we now have an English Android 9 AOSP environment with Google Play, Projectivy Launcher and the streaming and music applications we use. The result is more flexible, more familiar and considerably more useful for our everyday needs. Of course, there are limitations. Android 9 is an older operating system, future streaming compatibility cannot be guaranteed, and this conversion is not a certified Android TV installation. But the hardware has demonstrated that it can still deliver a very satisfying multimedia experience. CGR firmware download status: The current configuration is proven functional on our X08A. A public flashable release with exact partition instructions, hashes and rollback documentation must await validation of the complete current-system backup. Until then, treat this article as our documented conversion process, not as an invitation to flash arbitrary firmware images.
Did this article help you? If so, please tell me in a comment what do you think about it.
Don’t miss any of our future video tutorials, follow us on Youtube. Like us on Facebook. Join our Best Deals Telegram Channel. Join our Android TV Box Firmware Updates Telegram Channel. Subscribe now to our newsletter. If you need Tech Reviewer or Youtube Influencer read this. Donate now here to support CGR Team!